
Sharing Secrets With AI Agents: Step-By-Step Process (2024)

AI agents are becoming increasingly sophisticated, capable of automating complex tasks and interacting with various systems on our behalf. To perform these tasks effectively, they often require access to sensitive information like API keys, database credentials, or personal data. For example, an AI assistant could directly access your email to schedule meetings or manage your finances if it had secure credentials.
However, like when working with colleagues, securely sharing these credentials is key.
Storing credentials directly within an AI agent program or sharing them in plain text is highly insecure. Many industries have strict data protection regulations to minimize the risk of data breaches.
Secure credential management solutions streamline the development process by providing a standardized way to handle sensitive information: developers can securely share credentials with AI agents, and the risk of human error is minimized.
In this article, we’ll learn how to build a password manager that allows developers to securely share credentials with multiple AI agents using our secret management platform - Onboardbase.
Function Calling
First, we need to understand how to use function calling in AI agents.
OpenAI’s function calling allows your GPT AI agent to understand user requests and format them as function calls with a method and parameters. You can then use the bot’s output to interact with external systems to handle complex tasks, provide more accurate responses, and execute specific actions.
Step 1: Set Up Your Environment
Before you start, ensure you have the following:
- Node.js installed on your machine.
- An OpenAI API key.
- OpenAI credits to make API requests.

Step 2: Install Dependencies
In your project directory, install the necessary packages. Use npm to install the openai package:
npm install openaiStep 3: Initialize the OpenAI Client
Create a new JavaScript file, for example, app.js, and initialize the OpenAI client:
import OpenAI from "openai";

const openai = new OpenAI();

async function main() {
  const completion = await openai.chat.completions.create({
    messages: [{"role": "system", "content": "You are a helpful assistant."},
        {"role": "user", "content": "Who won the world series in 2020?"},
        {"role": "assistant", "content": "The Los Angeles Dodgers won the World Series in 2020."},
        {"role": "user", "content": "Where was it played?"}],
    model: "gpt-4o-mini",
  });

  console.log(completion.choices[0]);
}

main();
Step 4: Define Functions
Define the functions you want your AI to be able to call. Functions should be structured with clear parameters. For demonstration, let’s define a function that calculates the sum of two numbers:
function addNumbers(params) {
    const { a, b } = params;

    return { result: a + b };
}
Step 5: Configure Function Calling in the OpenAI API Request
When requesting to the OpenAI API, include the function definition in your request. This tells the API what functions are available for it to call:
async function askQuestion(question) {
    const response = await openai.chat.completions.create({
        model: 'gpt-4o-mini',
        messages: [{ role: 'user', content: question }],
        tools: [
            {
                type: 'function'
                function: {
                    name: 'addNumbers',
                    description: 'Adds two numbers together',
                    parameters: {
                        type: 'object',
                        properties: {
                            a: { type: 'number', description: 'First number to add' },
                            b: { type: 'number', description: 'Second number to add' },
                        },
                        required: ['a', 'b'],
                    },
                },
            }
        ]
    });

    return response.choices[0];
}
Step 6: Handle the Response
The response from the API will indicate if a function needs to be called. If so, execute the function with the parameters provided:
async function processResponse(response) {
    if(response.finish_reason == 'tool_calls'){
        const toolCall = response.message.tool_calls[0];
        const args = JSON.parse(toolCall.function.arguments)
        const result = addNumbers(...args);
        console.log(result)
    } else {
        console.log(response);
    }
}

async function main() {
    const question = 'What is the sum of 3 and 5?';
    const response = await askQuestion(question);
    await processResponse(response);
}

main();
Step 7: Run Your Application
Run your application using Node.js:
node app.jsUsing Onboardbase
This function-calling example was simple, but chances are you’ll need to interact with external services that require sensitive information like API keys, database credentials, or other secrets.
Developers rely on process.env variables to access environment variables directly, though this approach brings a number of security risks: the environment variables are available throughout the entire runtime of the application, unencrypted, and potentially displayed in logs and other debugging tools. Not to mention the possibility of leaking .env files in git repositories or in publicly accessible folders.
To solve this, Onboardbase is a centralized secret management platform that helps startups securely store, share, and manage secrets. The secrets are encrypted at rest using AES-256 and in transit with a combination of RSA and AES-GCM. The web dashboard makes it easy to put all your secrets in a single user interface that’s easy for everyone to access and contribute to without compromising on access control. For developers, you can just use the CLI with any programming language.
1. Defining a new API key
After signing up for Onboardbase, you can create a new API key. This key will be used to access a third-party API from your AI agent program.
Start by creating a new project, then add a new API key:

2. Updating our code
In your NodeJS app, you can access stored secrets as environment variables injected at runtime via CLI command.
First, define the environment variable in your code:
import dotenv from 'dotenv';
dotenv.config()

const API_KEY = process.env.API_KEY;
Then install the CLI tool:
npm install -g @onboardbase/cli@latestYou’ll need to login to your Onboardbase account:
onboardbase loginFinally, you can pick a project environment for your codebase with onboardbase setup then inject secrets in your code by wrapping your command with onboardbase run:
onboardbase run "node app.js"For other programming languages, have a look at the official documentation.
Now you won’t have to worry about manually managing your secrets or accidentally exposing them in your codebase.
3. Working with other developers
You always need a proper way to share secrets with teammates for effective collaboration while protecting sensitive data―if you have to run around after everyone to get access to a file, you’re losing precious time! However, improperly sharing secrets also greatly increases the risk of unauthorized access: stolen credentials are the n°1 cause of security leaks, and phishing comes second with 37% of all cyberattacks.
When you create a project and invite your teammates to Onboardbase, you can all work in a shared environment. With our Merge request system, your teammates can add new secrets to the project for review, like a pull request for secrets. This way, you can make sure your environment variables are always synchronized and up-to-date.
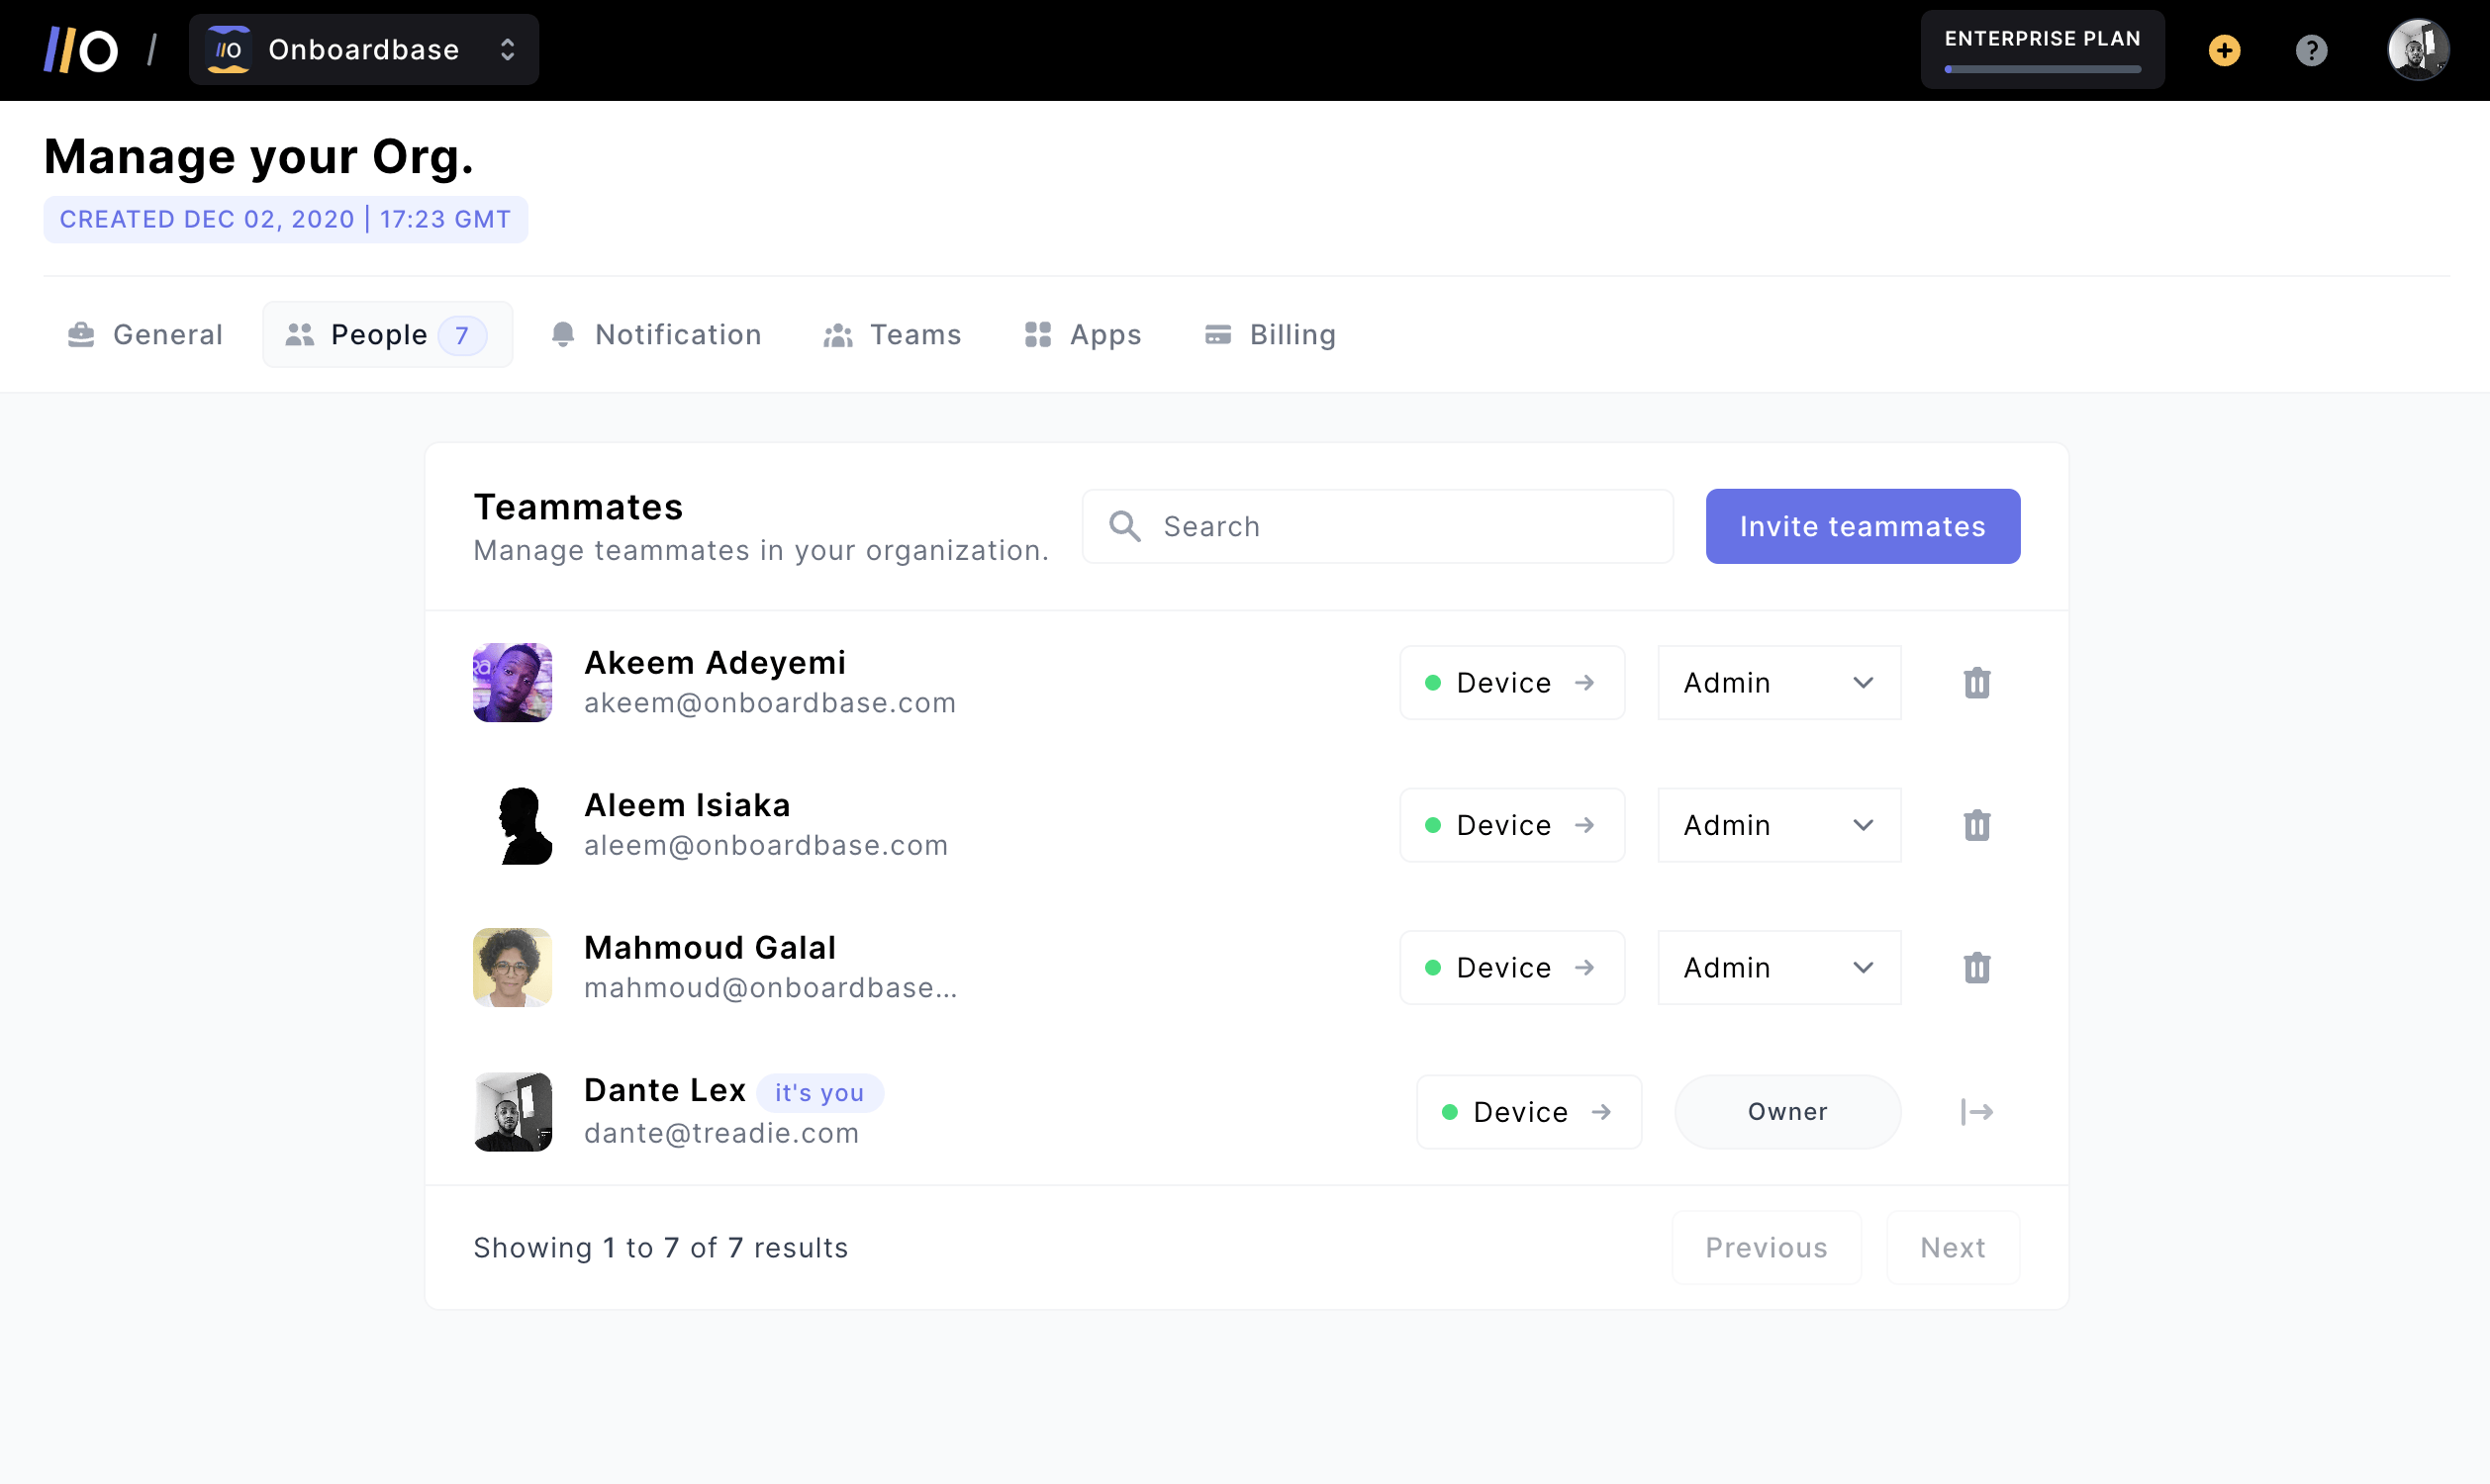
The access control interface is designed for modern development teams: you can define role permissions by user or by group, revoke accesses any time, and even invite non-technical teammates to collaborate.
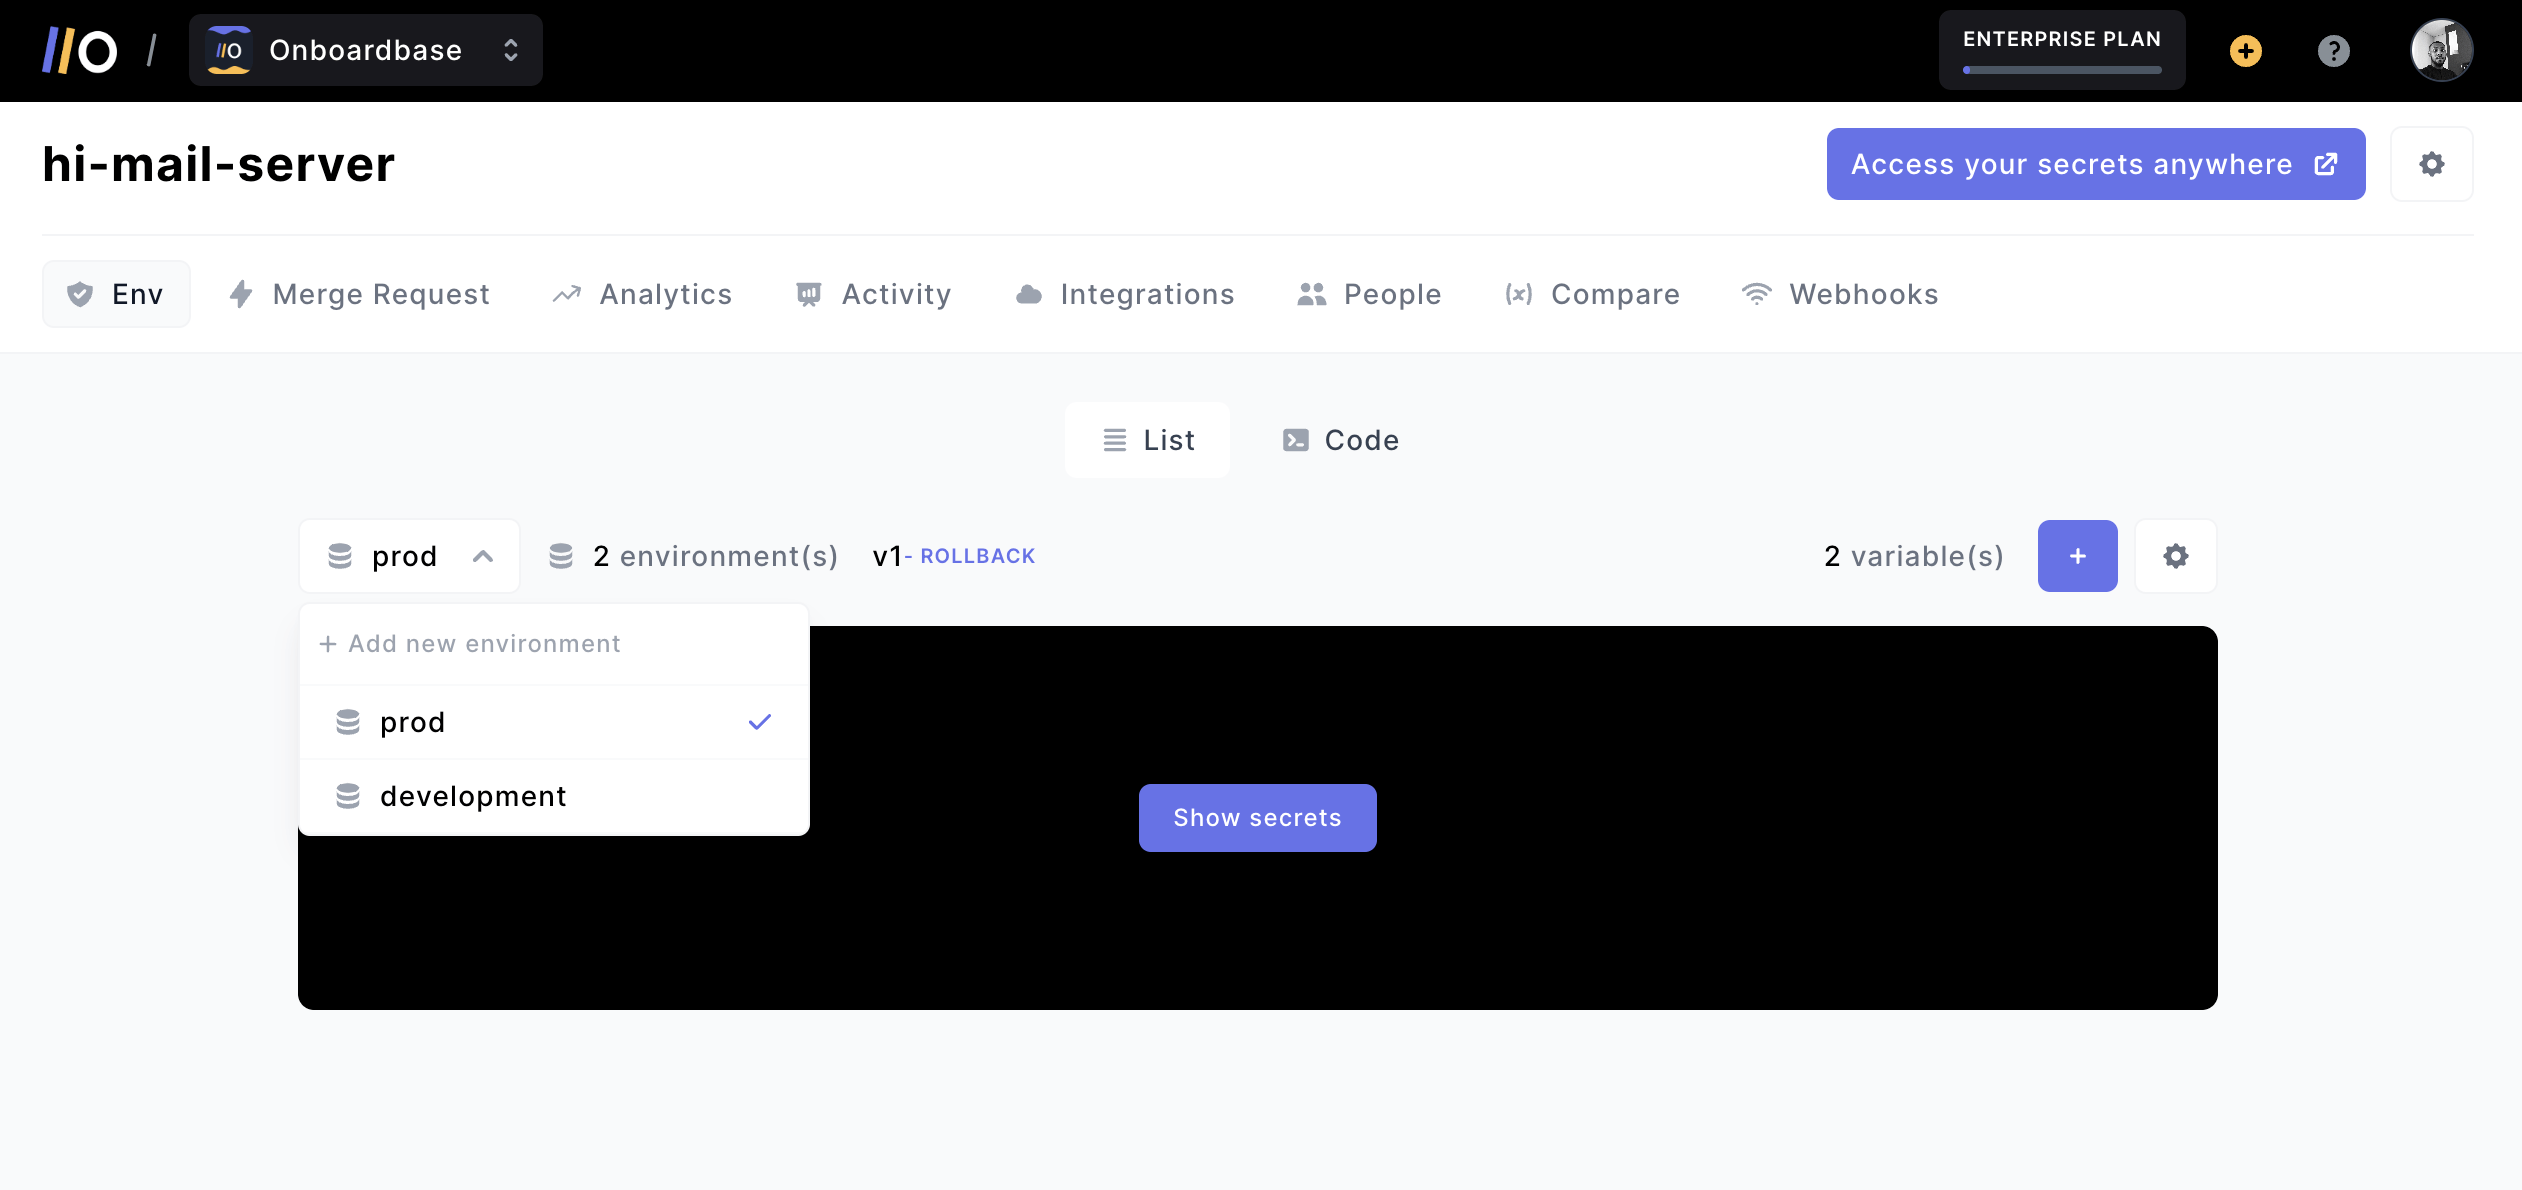
An important aspect of secret management includes handling multiple development environments. Onboardbase allows you to create different environments for your project like development, staging, and production.
Because there are many devops solutions out there, Onboardbase also sports plenty of integrations to choose from, including AWS Lambda, Github, Cloudflare Workers, and Firebase Functions.
4. Security monitoring
No matter how much you’re prepared, leaks are always a risk. Monitoring the usage of your secrets by AI agents is key to figuring out where things went wrong so that you don’t spend hours debugging. Onboardbase offers a secret usage monitoring feature that allows you to track all secret accesses in real-time. You can also set up alerts to be notified:
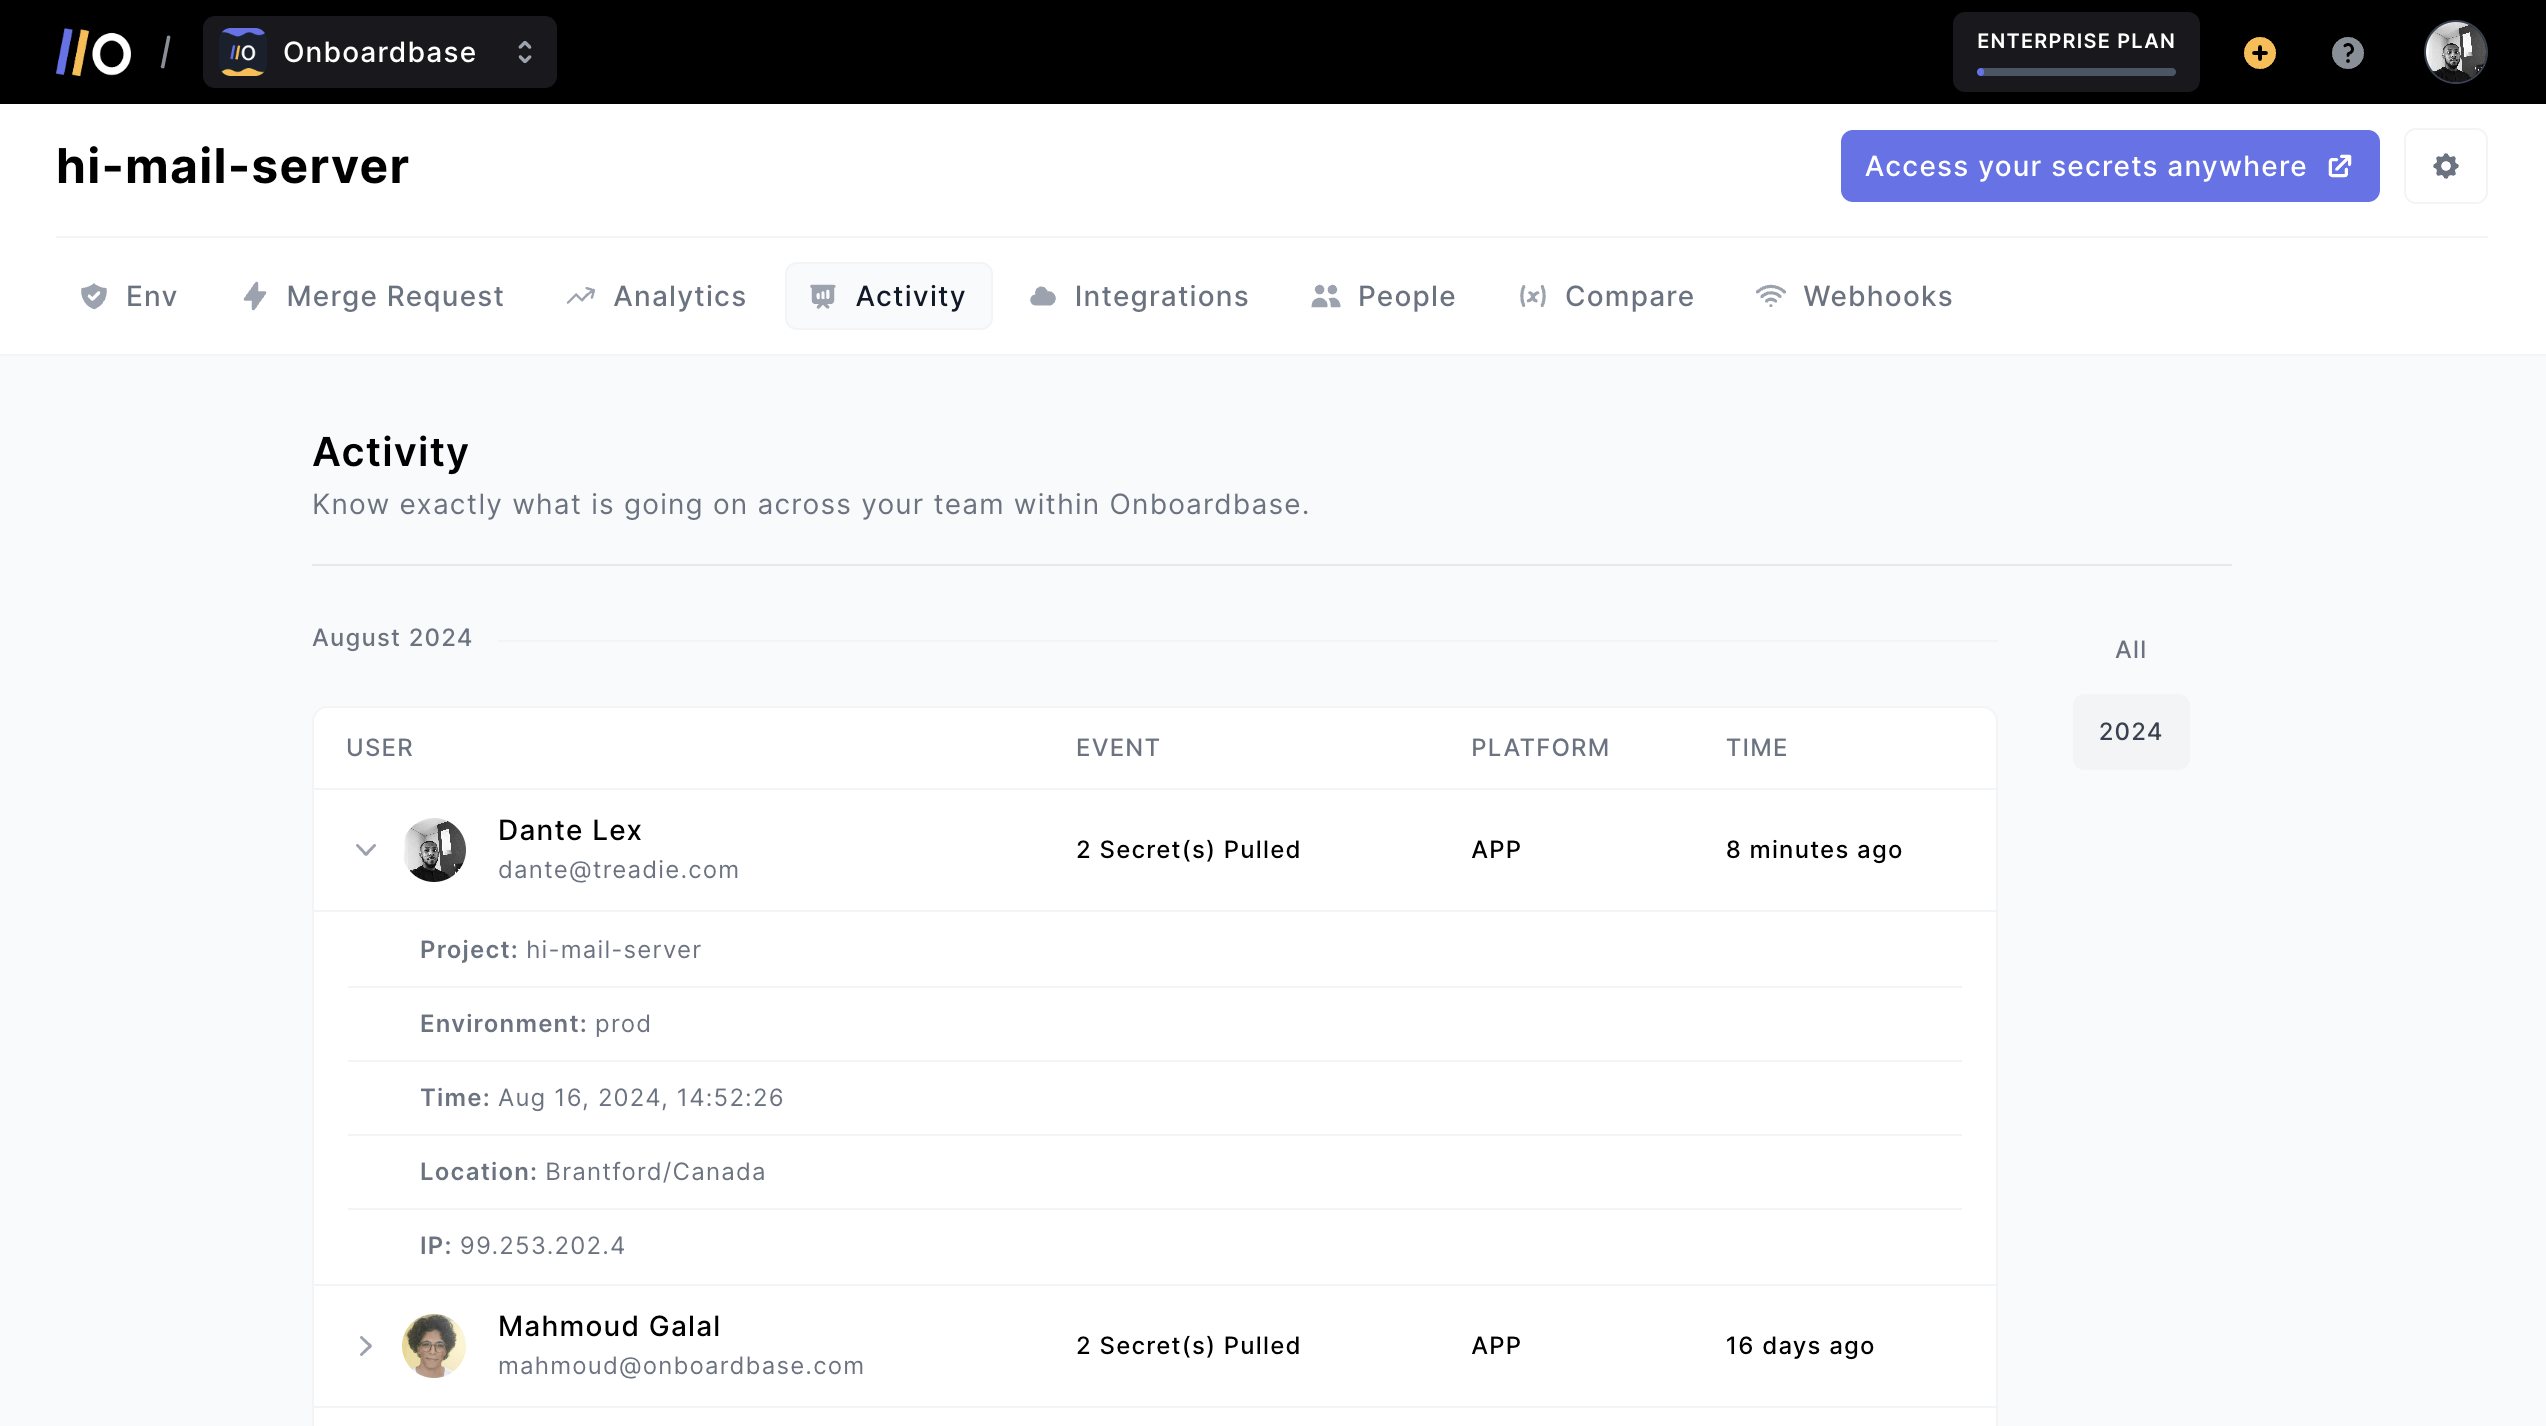
Real-time monitoring to notify dev teams when, where, and how secrets are being used. In case of data breaches, you can revoke accesses granularly in an instant.
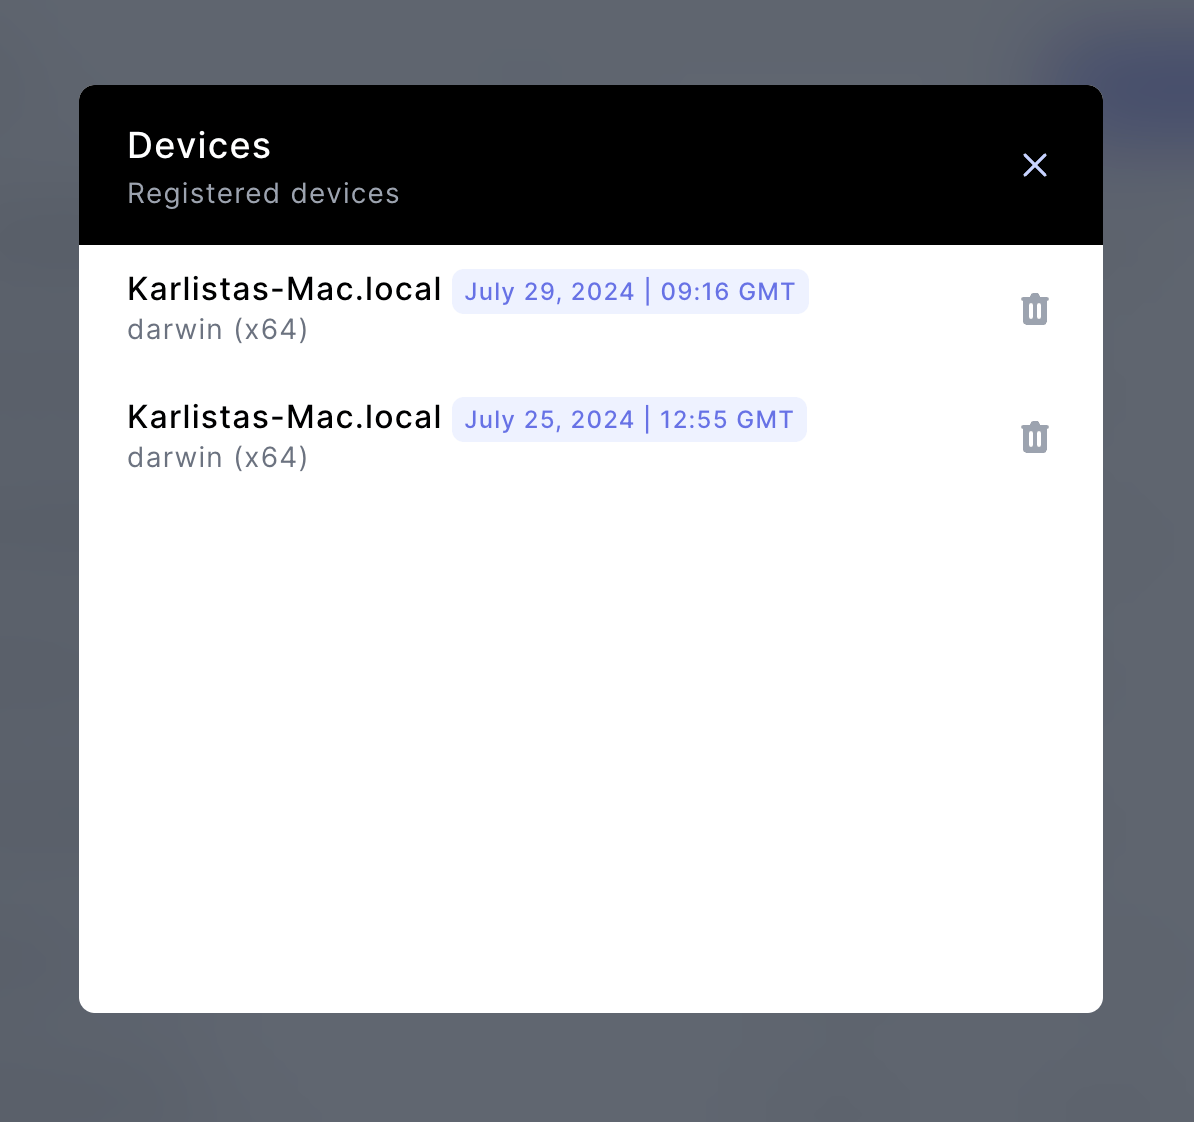
Device management is also available to keep track of all tools, cloud services, and devices connected to a project workspace, as well as a feature to ban compromised devices.
Proxy key architecture
What if you want to create a fleet of AI agents, though? This is the next obvious step of the AI revolution: multiple AI agents working together or users creating their own custom AI agent based on yours. It would be a security risk to give each agent access to all your infrastructure secrets. Instead, we can use a proxy key architecture to automate access management:
- Store one set of original credentials in Onboardbase.
- Each agent gets a unique proxy key and ID during initialization.
- The agent calls a gateway function with the proxy key.
- The gateway function swaps the proxy key for the real key and calls the corresponding agent function.
- If the agent is compromised, you can revoke the proxy key.
1. Generating a proxy key
We need to start by implementing the logic to generate a proxy key corresponding to a real secret. Let’s take the API key we previously used as an example.
Whenever we initialize a new AI agent, we first generate a cryptographic key using the crypto package:
import crypto from "node:crypto";
import { Buffer } from "node:buffer";

export function generateKey() {
	return crypto.subtle
		.generateKey(
			{
				name: "AES-GCM",
				length: 256,
			},
			true,
			["encrypt", "decrypt"]
		)
		.then((res) => crypto.subtle.exportKey("raw", res))
		.then((res) => Buffer.from(res).toString("hex"));
}
We’ll need the hashed and encrypted values of the proxy key:
function importKey(key) {
	const buf = Buffer.from(key, "hex");
	return crypto.subtle.importKey(
		"raw",
		buf,
		{
			name: "AES-GCM",
			length: 256,
		},
		true,
		["encrypt", "decrypt"]
	);
}

export async function encrypt(key, string) {
	const k = await importKey(key);

	const encoder = new TextEncoder("utf-8");

	const stringBuf = encoder.encode(string);

	let iv = self.crypto.getRandomValues(new Uint8Array(12));

	const iv_str = Buffer.from(iv).toString("hex");

	let encrypted = await crypto.subtle.encrypt(
		{
			name: "AES-GCM",
			length: 256,
			iv,
		},
		k,
		stringBuf
	);

	encrypted = Buffer.from(encrypted).toString("hex");

	return iv_str + ":" + encrypted;
}

export async function decrypt(key, string) {
	const decoder = new TextDecoder("utf-8");

	const k = await importKey(key);

	const textParts = string.split(":");

	const iv = Uint8Array.from(Buffer.from(textParts[0], "hex"));

	const encrypted = Uint8Array.from(Buffer.from(textParts[1], "hex"));

	// console.log(Uint8Array.from(Buffer.from(iv_str, 'hex')))

	const decrypted = await crypto.subtle.decrypt(
		{
			name: "AES-GCM",
			length: 256,
			iv,
		},
		k,
		encrypted
	);

	return decoder.decode(decrypted);
}

export async function hash(key) {
	const encoder = new TextEncoder("utf-8");

	const stringBuf = encoder.encode(key);

	const hashBuffer = await crypto.subtle.digest("SHA-256", stringBuf);

	return Buffer.from(hashBuffer).toString("hex");
}
We use SHA-256 for hashing and AES-256-GCM for encryption. We’ll use Onboardbase to securely store the encryption key used for AES-256.
We can then use Onboardbase Store to quickly store encrypted data. Onboardbase Store is a key/value store that handles encryption out-of-the-box. All we have to do is log in to the Onboardbase dashboard and create a new store:
We also use Onboardbase to keep the store reference as a secret.
We map our proxy key to a single secret and a unique AI agent, so if we have two secrets for two agents, we’ll store 4 unique proxy keys.
import Store from '@onboardbase/store';
import dotenv from 'dotenv';
dotenv.config();

const ENC_KEY = process.env.ENC_KEY;
const store = new Store(process.env.STORE_KEY);

const proxy_key = await generateKey();

await store.set({
    key: await hash(proxy_key),
    value: await encrypt(ENC_KEY, proxy_key),
    lockerKey: AI_AGENT_ID,
    secret: 'API_KEY'
});
2. Using the proxy key
On the server, we create a gateway function to swap the proxy key for the real key and call the corresponding agent function:
import { Hono } from 'hono'

const app = new Hono()

app.post('/', async ctx => {
    const key = ctx.request.headers['authorization'].slice(7);
    const AI_AGENT_ID = ctx.request.headers['ai-agent-id'];

    const proxy_key = await store.get({
        key: await hash(key),
        lockerKey: AI_AGENT_ID
    })

    const real_key = process.env[proxy_key.secret]

    const res = await fetch('https://<someservice>', {
        headers: {
            "Authorization": `Bearer ${real_key}`
        }
    })

    return ctx.json({
        ...res
    }, 200)
})

export default app
On the client, we rewrite our API calls to get proxied by our gateway:
await fetch('https://<gateway>', {
    method: 'POST',
    headers: {
        'Authorization': `Bearer ${proxy_key}`,
        'AI-Agent-ID': AI_AGENT_ID
    }
})
Once an AI agent uses a proxy key, our backend will take care of performing the API call.
3. Revoking access
If for some reason an AI agent gets compromised or is no longer in use, we can simply revoke access by deleting the proxy key from Onboardbase:
const key = ctx.request.headers['authorization'].slice(7);
const AI_AGENT_ID = ctx.request.headers['ai-agent-id'];

const proxy_key = await store.set({
    key: await hash(key),
    lockerKey: AI_AGENT_ID,
    secret: NULL
})
4. Rotating secrets
Similarly, we can easily rotate proxy keys without affecting the real secrets:
const key = await generateKey();
const AI_AGENT_ID = ctx.request.headers['ai-agent-id'];

const old_key = ctx.request.headers['authorization'].slice(7);
const old_proxy_key = await store.get({
    key: await hash(old_key),
    lockerKey: AI_AGENT_ID
})

const new_proxy_key = await store.set({
    ...old_proxy_key,
    key: await hash(key),
})
Conclusion
AI agents will revolutionize how we work―from developer companions to personal assistants and automation systems, the use cases are endless. But with great power comes great security concerns, and it’s crucial to prepare for them.
If I were to summarize the key takeaways from this article you should add to your to-do list today, it would be to start by finding tasks to delegate to AI agents. Then, create serverless functions to handle these tasks, implement a proxy key design pattern, and add function calls to the AI agent.
Onboardbase can play a key part in securing multi-AI agent systems, so make sure to sign up today and start securing your secrets! It’s free to try. Don’t hesitate to join our Discord community if you have any question, we’ll be happy to help.
Subscribe to our newsletter
The latest news, articles, features and resources of Onboardbase, sent to your inbox weekly